Why Does a Green Ring Appear Around Hard-Boiled Eggs?
The pursuit of the perfect hard-boiled egg is a culinary ritual that many home cooks find deceptively challenging. You may have meticulously followed a recipe for a salad or a quick snack, only to peel back the shell and find an uninviting, greenish-gray halo encircling the yolk. While this discoloration is a common occurrence, it often leaves people questioning the freshness of their eggs or their own capabilities in the kitchen. However, there is no need for alarm. This phenomenon is not a sign of spoilage, nor is it a reflection of poor cooking skills—it is a fascinating, albeit visually unappealing, result of basic chemistry. Understanding the science behind the “green ring” is the first step toward mastering the art of the flawless hard-boiled egg.
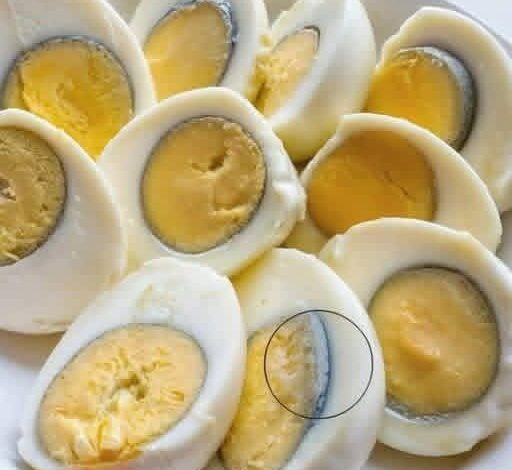
The Chemistry of the Green Ring
The primary culprit behind this discoloration is a chemical reaction triggered by heat. Specifically, it involves two elements found naturally within the egg: iron, which is concentrated in the yolk, and sulfur, which is found in the egg white. When an egg is subjected to high temperatures for an extended period—commonly known as overcooking—these two components begin a chemical dance. The sulfur in the white is released as hydrogen sulfide gas, which then reacts with the iron on the surface of the yolk.
The result of this reaction is the formation of iron sulfide ($FeS$). This compound manifests as a thin, grayish-green layer right at the interface where the white meets the yolk. While iron sulfide is completely safe to ingest, its presence is a clear indicator that the delicate proteins in the egg have been pushed too far. Beyond the visual deterrent, overcooking also intensifies the distinctive sulfurous odor that many find off-putting, transforming what should be a mild, creamy snack into something far more pungent.
A Masterclass in Boiling Technique
Fortunately, sidestepping this chemical pitfall does not require a degree in food science or professional culinary training. It simply requires a shift in methodology, focusing on temperature control and precise timing. By following a few disciplined steps, you can ensure that your yolks remain a vibrant, golden yellow every single time.
1. The Cold Start Advantage
One of the most common mistakes is dropping cold eggs directly into boiling water. This sudden temperature shock often causes the shells to crack and leads to uneven cooking. Instead, place your eggs in a single layer at the bottom of a pot. Cover them with cold water, ensuring there are at least 3 to 5 centimeters of water above the eggs. Starting with cold water allows the egg and the liquid to rise in temperature together, promoting a more even cook and a sturdier shell.
2. Gradual Heat and the “Off-Heat” Method
Place the pot over medium heat and bring it to a gentle, rolling boil. Avoid using maximum heat, as violent bubbles can cause the eggs to bounce against the sides of the pot and fracture. The moment the water reaches a full boil, remove the pot from the heat source entirely and cover it with a lid. This “carry-over” cooking method is the secret to tender whites and perfectly set yolks, as it prevents the temperature from climbing high enough to trigger the iron-sulfur reaction.
3. Precision Timing
Once the lid is on and the heat is off, let the eggs sit undisturbed. The duration depends on your personal preference for texture:
- 9 Minutes: Results in a slightly soft, jammy yolk with a creamy mouthfeel—perfect for toast.
- 12 Minutes: Produces a fully firm, classic yolk that is ideal for deviled eggs or dicing into a Cobb salad.
4. The Essential Ice Bath
The most critical step in preventing the green ring occurs after the timer goes off. You must immediately stop the cooking process. Prepare a bowl filled with ice and cold water, and transfer the eggs directly into this “ice bath.” This rapid cooling prevents the residual heat trapped inside the egg from continuing the chemical reaction. Let them chill for at least five minutes; this not only saves the color of the yolk but also causes the egg to slightly contract away from the shell, making it much easier to peel.
5. Stress-Free Peeling
To achieve a smooth, unblemished egg white, gently tap the cooled egg on a hard surface to create a network of fine cracks. Peeling the egg under a stream of cool, running water or submerged in a bowl of water can help the liquid slip between the membrane and the white, allowing the shell to slide off in large, satisfying pieces.
Pro-Tips for Culinary Success
While timing and temperature are paramount, a few extra variables can elevate your results from good to professional:
- The Age of the Egg: If you are planning to make hard-boiled eggs, try to use eggs that are five to seven days old. Very fresh eggs have a lower pH level, which causes the membrane to stick tenaciously to the shell. As eggs age, the pH increases, and the bond weakens, resulting in a cleaner peel.
- Stabilizing the Whites: Adding a splash of white vinegar or a teaspoon of salt to the water can act as an insurance policy. If an egg happens to crack during the initial heating phase, these additives help the egg white coagulate faster, sealing the crack and preventing messy “streamers” from clouding your pot.
- Proper Storage: Hard-boiled eggs should be kept in the refrigerator. If they are unpeeled, they will remain fresh for up to one week. Once peeled, they should be consumed within two to three days to maintain their texture and flavor profile.
Beyond the Kitchen: Why Details Matter
Mastering something as simple as a hard-boiled egg is a reminder that small details often dictate the quality of our experiences. Whether it is the split-second decision that allowed a Wheel of Fortune contestant to solve a $65,000 puzzle instantly this week, or understanding the scientific explanation for why mosquitoes seem to target certain people over others, knowledge provides us with an edge.
In the kitchen, that edge means no longer settling for rubbery whites and unappealing green yolks. By respecting the chemistry of the egg—starting cold, timing the steep, and chilling promptly—you transform a basic ingredient into a culinary asset. Your guests will notice the difference, and your salads will finally look as vibrant as they were intended to be. The secret is out: timing is everything.